
Search the Community
Showing results for tags 'Fusion'.
-
 I am currently selling my BARELY used Cobb AccessPort. I tuned my 2014 Ford Fusion 2.0 EcoBoost for one day, and uninstalled the tune, and its been in the case ever since. There is nothing wrong with it at all, just would rather sell it to someone that would actually use it then have it sit in my dresser. I had only tuned my car for the day mainly out of curiousity, then had to get it serviced ( which is why I uninstalled the tune) just in case you know? and just really never messed with it since for some reason. ** This AccessPort is unmarried** Comes with all accessories I am asking $350. I purchased it for $500 on Mountune's site, and think that is a real reasonable price for how much its been used. Throw me some offers though, the worst I can say is No And I just realized all pictures are horizontal and Im sorry haha
 -
 2017 MKZ/Fusion/Continental – Window Bounce Back And/Or Loss Of Window One-Touch Up Functionality Some 2017 MKZ, Fusion, and Continental vehicles may exhibit window bounce back when using the one-touch feature and/or a loss of window one-touch up functionality. Perform the Integrated Diagnostic System (IDS) power door window initialization procedure. The learn procedure is available on IDS software version 103.05 or later. Access to this IDS learn procedure is available under Toolbox / Body /Power Window Initialization. No additional repairs should be attempted if this does not resolve the concern. Engineering is aware and is currently investigating. Monitor OASIS for future updates.
 -
 Hello ford enthusiasts! Wanted advise on an option to buy a Ford Fusion Hybrid SE 2017 as a used vehicle. The odometer is at 3200. The car was used as a courtesy vehicle at the dealership. At $20,000 does it sound like a good deal?
 -
I'm very confused about how many speakers I have in my 2006 Ford Fusion SEL. I've noticed that car reviews online have said that the car comes with 6 speakers, but in my car I think I have 8. I have 1 on each door (4) then 2 tweeters on the front doors (2) and 2 in the back part, above the trunk... so my math tells me 8 speakers. Maybe tweeters aren't considered speakers. I don't know?
-
 I have a 2006 Ford Fusion SEL V6 that had a standard 6 CD radio when I bought it, I recently bought a used 2006 Ford Five Hundred Ford navigation system. It works but the bass just isn't as good/loud as it was before, I turned the bass up in the sounds options but not too much changed. Also my steering wheel controls no longer work for the Ford navigation system.
 -
Ran the OBD and it threw thelse codes: Any help as to what might be the problem?
-
I have a 2008 Ford Fusion SE with 50,100 miles, which has a slight front end wobble or shaking issue when accelerating between the speeds of 20-25 mph which goes away after reaching 25mph. The tires are wearing perfectly. There are no noises, just a slight shimmy or shaking as previously stated. Has anyone else experienced something similar? I brought it in to a Ford dearer but they weren't able to pin it down at the time. But now that its getting more noticeable I plan on bringing it in again. Anyone have an ideas what they should be checking for? I live in Minneapolis, any suggestions on where to bring it to have it repaired. Thanks
-
 This past week when pulling into my driveway I shifted my car into park and I could feel something give. I could not shift out of park after so I removed console to do it manually as shift interlock override was not working. I can manually shift but the dash indicator is obviously misaligned and it will never go into park or register on the dash as going into park (Only seems to recognize park when I kill the engine in neutral with handbrake on and then shift to park; thus releasing the key). Other than that I can get it to go into all other gears(R, N, D, M) with some "finagling". I took it into the dealer as this problem is above me and they just looked at it this morning (11/21/16) and they just called with a quote. They said the linkage was broken and I needed a new shifter assembly. At least that's what I think they told me over the phone. They stated they would have to pull the dash to install the new part and the price would be $1663 with labor. I realize labor is expensive but does it really take them that long to pull the dash; is this a reasonable price? I always trusted the dealer I used when I lived in Oklahoma but this now local dealer(Texas) told me in the past my wife's vehicle needed brakes but I took it to an excellent local mechanic(who is a good friend of my dad's) and they told me they were fine. So I don't know whether to trust this quote as it seems a little ridiculous? For now I'm gonna pass on fixing it as it still drives fine, I just have to manually release the lever to shift out of park which isn't a huge deal for know other than not having the console pieces in place Any and all help is appreciated. Info on car: 2011 Fusion SE Purchased Certified Pre-Owned in 2013 Has less than 40,000 miles. Filed complaint with NHTSA
 -
2017 MKZ/Continental/Fusion – 3.0L/2.7L – Rough Idle – Misfire DTCs – White Or Blue Smoke And/Or Excessive Oil Consumption – Built On Or Before 6-Oct-2016 Some 2017 MKZ/Continental/Fusion vehicles equipped with the 2.7L/3.0L engine and built on or before 6-Oct-2016 may exhibit a rough idle in neutral or park at normal operating temperature or after a hot restart, white or blue smoke from the exhaust, excessive oil consumption and/or an illuminated malfunction indicator lamp (MIL) with diagnostic trouble codes (DTCs) P0300, P0301, P0302, P0303, P0304, P0305, P0306 and/or P0316. Suspect the cylinder heads as the cause for this issue. If the vehicle also exhibits P0524 and/or P06DD suspect the long block as the cause for this issue.
-
NHTSA Campaign Number: 16V875000 Manufacturer Ford Motor Company Components SEAT BELTS Potential Number of Units Affected 603,392 Summary Ford Motor Company (Ford) is recalling certain model year 2013-2016 Ford Fusion vehicles manufactured November 2, 2012, to July 31, 2014, and 2013-2015 Lincoln MKZ vehicles manufactured November 14, 2012, to July 31, 2014. In the event of a crash, heat from the deployment of a seat belt pretensioner may cause a front seat belt anchor cable to fail. Remedy Ford will notify owners, and dealers will apply a protective coating to the seat belt cable, free of charge. Remedy parts are currently unavailable. Owners will be notified of the safety issue beginning on January 20, 2017. Remedy parts are expected to be available by the second quarter of 2017, and at that time, owners will be mailed a second notice. Owners may contact Ford customer service at 1-866-436-7332. Ford's number for this recall is 16S42. Notes Owners may also contact the National Highway Traffic Safety Administration Vehicle Safety Hotline at 1-888-327-4236 (TTY 1-800-424-9153), or go to www.safercar.gov. 7 Affected Products Vehicles MAKE MODEL YEAR FORD FUSION 2013-2016 LINCOLN MKZ 2013-2015 Safety Recall 16S42 Media Statement.pdf Safety Recall 16S42 Interim Owner Notification Letter(Part 577).pdf Safety Recall 16S42 Recall Acknowledgement.pdf Safety Recall 16S42 Defect Notice 573 Report.pdf Safety Recall 16S42 DEMONSTRATION DELIVERY HOLD - Advance Notice.pdf
-
NHTSA Campaign Number: 16V874000 Manufacturer Ford Motor Company Components SEATS Potential Number of Units Affected 25 Summary Ford Motor Company (Ford) is recalling certain 2017 Ford Fusion vehicles manufactured September 27, 2016, to September 28, 2016. The left rear seat backs pivot pins may have been improperly welded. Remedy Ford will notify owners, and dealers will replace the left hand, second row seat back frame, free of charge. The recall began January 10, 2017. Owners may contact Ford customer service at 1-866-436-7332. Ford's number for this recall is 16S43. Notes Owners may also contact the National Highway Traffic Safety Administration Vehicle Safety Hotline at 1-888-327-4236 (TTY 1-800-424-9153), or go to www.safercar.gov. 16V874 Left Rear SeatBackFrame Improperly Welded_Media.pdf 16V874 Left Rear SeatBackFrame Improperly Welded_Defect Report.pdf 16V874 Left Rear SeatBackFrame Improperly Welded_Defect Acknowledgement.pdf 16V874 Left Rear SeatBackFrame Improperly Welded_Owner Notification.pdf
-
2013-2016 Fiesta/Escape/Transit Connect/2013 Fusion – 1.6L GTDI – Engine Oil Dipstick Reads Above Maximum Mark 2013-2016 Fiesta, Escape, Transit Connect and 2013 Fusion vehicles with a 1.6L Gasoline Turbocharged Direct Injection (GTDI) engine may exhibit an engine oil level reading that is up to 8 mm above the maximum mark on the engine oil dipstick when the engine is filled with the correct amount of oil. This is a normal characteristic of this engine. Do not lower the oil level to the maximum mark on the engine oil dipstick if the engine contains the correct amount of oil. Adding oil is not required if the level is above the minimum mark on the engine oil dipstick. Refer to the owner’s manual for proper engine oil capacity. ================== I know 8 mm is not a lot, but still ...
-
2017 Fusion – Stuck In Park And/or Buzz Noise From Gearshift Module (GSM) – Diagnostic Trouble Code (DTC) P0915 – Built On or Before 9-Aug-2016 Some 2017 Fusion vehicles built on or before 9-Aug-2016 may exhibit DTC P0915 with vehicle stuck in park and/or buzz noise from rotary dial Gearshift Module (GSM). Address any additional DTCs first. DTC P0915 sets when battery voltage is low at start up. The root cause of the low battery condition must be identified and corrected. Refer to Workshop Manual (WSM), Section 414-01. Reprogram the GSM using Integrated Diagnostic System (IDS) release 103.01 or higher. Make sure you are connected to the internet while module programming to obtain the latest updates. Calibration files may also be obtained at www.motorcraftservice.com. Remove and reinstall fuse #13 from Body Control Module (BCM) to reset the GSM after programming. Clear GSM DTC’s. Module Reprogramming & Initialization Software necessary to program electronic modules to the latest calibration level, perform module initialization (PATS), and set Programmable Parameters on Ford, Lincoln and Mercury vehicles. Ford Module Programming (FMP) is a software application that allows subscribers to program electronic modules on Ford, Lincoln and Mercury vehicles. It can be used for: Reprogramming emission-related (OBDII) modules on some vehicles manufactured in 1995 and all vehicles manufactured from 1996 to the present Reprogramming or reconfiguring non-emission-related modules on many vehicles (UBP and MS-CAN not supported) In addition, module initialization (PATS) functions such as Keycode Erase/Reprogram and PCM Parameter Reset can be done using this application. J2534 Device using Ford Module Programming (FMP) can Reprogram and Configure most Modules. Latest Calibration Information Module Build Data (As-Built) Use VIN to obtain As-Built data www.motorcraftservice.com
-
1.5L GTDI ENGINE – VIBRATION IN PARK Publication Date: July 12, 2016 FORD: 2014-2016 Fusion ISSUE: Some 2014-2016 Fusion vehicles equipped with a 1.5L Gasoline Turbo Direct Injection (GTDI) engine may exhibit an engine vibration while in park and at idle. This condition may be more pronounced with the A/C on. A new generator pulley is available to reduce the engine vibration. ACTION: Follow the Service Procedure steps to correct the condition. SERVICE PROCEDURE 1. Does the vehicle exhibit an engine vibration in park and at idle? a. Yes – proceed to Step 2. b. No – this article does not apply. Refer to Workshop Manual (WSM), Section 100-04 for normal diagnostics. 2. Is the vehicle equipped with heated seats? a. Yes – this article does not apply. Refer to WSM, Section 100-04 for normal diagnostics. b. No – proceed to Step 3. 3. Replace the generator pulley and cap. Refer to WSM, Section 414-02. a. The new pulley has a larger diameter and will help reduce engine vibration. PART NUMBER PART NAME CJ5Z-10344-B Generator Pulley BR3Z-10325-A Generator Cap OPERATION DESCRIPTION TIME 160095A 2014-2016 Fusion 1.5L GTDI: Verify Concern And Replace The Generator Pulley Includes Time To Remove And Install Generator (Do Not Use With Any Other Labor Operations) 0.7 Hr. WARRANTY STATUS Eligible Under Provisions Of New Vehicle Limited Warranty Coverage. Warranty/ESP coverage limits/policies/prior approvals are not altered by a TSB. Warranty/ESP coverage limits are determined by the identified causal part and verified using the OASIS part coverage tool. DEALER CODING BASIC PART NO. CONDITION CODE 10344 42
-
6F35 – HARSH TRANSMISSION ENGAGEMENT DURING ACTIVE START/STOP EVENT AND DTC P0C27 Publication Date: September 1, 2016 2014-2016 Fusion, 2015-2016 Edge ISSUE: Some 2014-2016 Fusion and 2015-2016 Edge vehicles equipped with a 6F35 transmission and active start/stop feature may exhibit an illuminated malfunction indicator lamp (MIL) with a harsh transmission engagement after an active stop/start event. Diagnostic trouble code (DTC) P0C27 will be stored in the powertrain control module (PCM) memory. This condition may be caused by air entering the transmission fluid auxiliary pump supply tube. ACTION: Follow the Service Procedure steps to correct the concern. SERVICE PROCEDURE 1. Using an Integrated Diagnostic System (IDS) or equivalent scan tool retrieve DTCs. Is DTC P0C27 present in the PCM memory? a. Yes – proceed to Step 2. b. No – this article does not apply. Refer to Workshop Manual (WSM), Section 307-01. 2. Check the transmission build date. Refer to WSM, Section 307-01. Was the transmission built on or before 2/26/2016? a. Yes – proceed to Step 3. b. No – this article does not apply. Refer to WSM, Section 307-01. 3. Remove the transmission fluid auxiliary pump. Refer to WSM, Section 307-01. 4. Remove and discard the transmission fluid auxiliary pump supply tube. (Figure 1) Figure 1 5. Install a new transmission fluid auxiliary pump supply tube which contains a check ball. 6. Reinstall the transmission fluid auxiliary pump. Refer to WSM, Section 307-01. 7. Clear DTCs. PART NUMBER PART NAME DG9Z-7A136-B Gasket – Pump W715931-S437 Bolts – Pump (3 Req) DG9Z-7890-G Pick Up Tube XT-10-QLVC Motorcraft MERCON LV Automatic Transmission Fluid OPERATION DESCRIPTION TIME 160111A 2014-2016 Fusion, 2015-2016 Edge 6F35 Transmission: Retrieve DTCs And Replace The Transmission Fluid Auxiliary Pump Supply Tube (Do Not Use With Any Other Labor Operations) 1.6 Hrs. WARRANTY STATUS Eligible Under Provisions Of New Vehicle Limited Warranty Coverage And Emissions Warranty Coverage. Warranty/ESP coverage limits/policies/prior approvals are not altered by a TSB. Warranty/ESP coverage limits are determined by the identified causal part and verified using the OASIS part coverage tool. DEALER CODING BASIC PART NO. CONDITION CODE 7890 42
-
A-PILLAR TRIM OUT OF POSITION NEAR THE HEADLINER – FLAT ROCK ASSEMBLY PLANT – BUILT ON OR BEFORE 26-AUG-2016 Publication Date: September 1, 2016 FORD: 2014-2016 Fusion ISSUE: Some 2014-2016 Fusion vehicles built at the Flat Rock assembly plant and built on or before 26-Aug-2016 may exhibit an A-pillar trim panel out of position near the headliner at one or both front doors. ACTION: Follow the Service Procedure steps to correct the condition. SERVICE PROCEDURE 1. Does the vehicle exhibit an A-pillar trim panel out of position near the headliner? (Figure 1) Figure 1 a. Yes – proceed to Step 2. b. No – this article does not apply. 2. Check the vehicle identification number (VIN). Does the first digit of the VIN start with the number 1? Refer to Workshop Manual (WSM), Section 100-01. a. Yes – proceed to Step 3. b. No – the vehicle was not built at the Flat Rock assembly plant. Refer to WSM, Section 501-05 for normal diagnosis. 3. Remove the lower interior B-pillar trim panel. Refer to WSM, Section 501-05. 4. Remove and discard the upper B-pillar trim panel. Refer to WSM, Section 501-05. 5. Remove the assist handle retainer covers and the retainers and remove the assist handle. 6. Remove the sun visor and sun visor clip. Refer to WSM, Section 501-05. 7. Remove and discard the upper A-pillar trim panel. Refer to WSM, Section 501-05. 8. Position the headliner down so the forward foam block/stuffer can be accessed. (Figure 2) Figure 2 9. From the outside edge of the foam, measure and mark 17 mm (21/32″). (Figure 2) 10. Using a hacksaw blade or equivalent, cut and remove 17 mm (21/32″) from the outside edge of the foam. (Figure 3) Figure 3 11. To install, reverse the removal procedure. PART NUMBER PART NAME W715667-S439 Trim Clip (Package 4) DS7Z-5403599-FB A-pillar Trim – Driver Side – Earth Gray DS7Z-5403598-FB A-pillar Trim – Passenger Side – Earth Gray DS7Z-5424356-AD B-pillar Trim- Driver Side – Earth Gray DS7Z-5424357-AD B-pillar Trim – Passenger Side – Earth Gray DS7Z-5424357-AC B-pillar Trim – Driver Side – Dune DS7Z-5424356-AC B-pillar Trim – Passenger Side – Dune DS7Z-5403599-AE A-pillar Trim – Driver Side – Dune DS7Z-5403598-AE A-pillar Trim – Passenger Side – Dune OPERATION DESCRIPTION TIME 160112A 2014-2016 Fusion: Measure And Cut The Foam Block/Stuffer At One (1) Front Door Following The Service Procedure (Do Not Use With Any Other Labor Operations) 0.6 Hr. 160112B 2014-2016 Fusion: Measure And Cut The Foam Block/Stuffer At Both (2) Front Doors Following The Service Procedure (Do Not Use With Any Other Labor Operations) 1.0 Hr. WARRANTY STATUS Eligible Under Provisions Of New Vehicle Limited Warranty Coverage. Warranty/ESP coverage limits/policies/prior approvals are not altered by a TSB. Warranty/ESP coverage limits are determined by the identified causal part and verified using the OASIS part coverage tool. DEALER CODING BASIC PART NO. CONDITION CODE 5403598 07
-
2.0L GTDI – LACKS POWER – ILLUMINATED MIL – DIAGNOSTIC TROUBLE CODE (DTC) P0234 – BUILT ON OR BEFORE 31-AUG-2016 Publication Date: September 13, 2016 2017 Fusion, 2017 MKZ ISSUE: Some 2017 Fusion and MKZ vehicles equipped with a 2.0L Gasoline Turbocharged Direct Injection (GTDI) engine built on or before 31-Aug-2016 may exhibit a lack of power drivability concern with an illuminated malfunction indicator lamp (MIL) and DTC P0234 stored in powertrain control module (PCM) memory. ACTION: Follow the Service Procedure steps to correct the condition. SERVICE PROCEDURE 1. Connect the Ford Integrated Diagnostic System (IDS) service tool or equivalent scan tool to the data link connector (DLC). Does the vehicle have a lack of power and DTC P0234 stored in PCM memory? a. Yes – reprogram the PCM to the latest calibration using IDS release 102.01 or higher. Make sure you are connected to the internet when entering module programming to obtain the latest updates. Calibration files may also be obtained at www.motorcraftservice.com. b. No – this article does not apply. Refer to Powertrain Control/Emission Diagnosis (PC/ED) manual for normal diagnostics. NOTE: ADVISE THE CUSTOMER THAT THIS VEHICLE IS EQUIPPED WITH AN ADAPTIVE TRANSMISSION SHIFT STRATEGY WHICH ALLOWS THE VEHICLE’S COMPUTER TO LEARN THE TRANSMISSION’S UNIQUE PARAMETERS AND IMPROVE SHIFT QUALITY. WHEN THE ADAPTIVE STRATEGY IS RESET, THE COMPUTER WILL BEGIN A RE-LEARNING PROCESS. THIS RE-LEARNING PROCESS MAY RESULT IN FIRMER THAN NORMAL UPSHIFTS AND DOWNSHIFTS FOR SEVERAL DAYS. OPERATION DESCRIPTION TIME 160119A 2017 Fusion/MKZ 2.0L GTDI: Retrieve DTCs And Reprogram The PCM (Do Not Use With Any Other Labor Operations) 0.4 Hr. WARRANTY STATUS Eligible Under Provisions Of New Vehicle Limited Warranty Coverage And Emissions Warranty Coverage. Warranty/ESP coverage limits/policies/prior approvals are not altered by a TSB. Warranty/ESP coverage limits are determined by the identified causal part and verified using the OASIS part coverage tool. DEALER CODING BASIC PART NO. CONDITION CODE RECALEM 04 ________________________________________ Module Reprogramming & Initialization Software necessary to program electronic modules to the latest calibration level, perform module initialization (PATS), and set Programmable Parameters on Ford, Lincoln and Mercury vehicles. Ford Module Programming (FMP) is a software application that allows subscribers to program electronic modules on Ford, Lincoln and Mercury vehicles. It can be used for: • Reprogramming emission-related (OBDII) modules on some vehicles manufactured in 1995 and all vehicles manufactured from 1996 to the present • Reprogramming or reconfiguring non-emission-related modules on many vehicles (UBP and MS-CAN not supported) In addition, module initialization (PATS) functions such as Keycode Erase/Reprogram and PCM Parameter Reset can be done using this application. J2534 Device using Ford Module Programming (FMP) can Reprogram and Configure most Modules. Latest Calibration Information Module Build Data (As-Built) Use VIN to obtain As-Built data www.motorcraftservice.com
-
2.0L GTDI – ILLUMINATED MALFUNCTION INDICATOR LAMP (MIL) – DIAGNOSTIC TROUBLE CODE (DTC) P04DB – BUILT ON OR BEFORE 31-AUG-2016 Publication Date: September 13, 2016 2017 Fusion, 2017 MKZ ISSUE: Some 2017 Fusion and MKZ vehicles equipped with a 2.0L Gasoline Turbocharged Direct Injection (GTDI) engine and built on or before 31-Aug-2016 may exhibit an Illuminated MIL with DTC P04DB (crankcase ventilation system disconnected) in the powertrain control module (PCM) memory. ACTION: Follow the Service Procedure steps to correct the condition. SERVICE PROCEDURE 1. Connect the Ford Integrated Diagnostic System (IDS) service tool or equivalent scan tool to the data link connector (DLC). Does the vehicle have DTC P04DB stored in PCM memory? a. Yes – Reprogram the PCM to the latest calibration using IDS release 102.01 or higher. Make sure you are connected to the internet when entering module programming to obtain the latest updates. Calibration files may also be obtained at www.motorcraftservice.com. b. No – This article does not apply. Refer to Powertrain Control/Emission Diagnosis (PC/ED) manual for normal diagnostics. NOTE: ADVISE THE CUSTOMER THAT THIS VEHICLE IS EQUIPPED WITH AN ADAPTIVE TRANSMISSION SHIFT STRATEGY WHICH ALLOWS THE VEHICLE’S COMPUTER TO LEARN THE TRANSMISSION’S UNIQUE PARAMETERS AND IMPROVE SHIFT QUALITY. WHEN THE ADAPTIVE STRATEGY IS RESET, THE COMPUTER WILL BEGIN A RE-LEARNING PROCESS. THIS RE-LEARNING PROCESS MAY RESULT IN FIRMER THAN NORMAL UPSHIFTS AND DOWNSHIFTS FOR SEVERAL DAYS. OPERATION DESCRIPTION TIME 160120A 2017 Fusion/MKZ 2.0L GTDI: Retrieve DTCs And Reprogram The PCM (Do Not Use With Any Other Labor Operations) 0.4 Hr. WARRANTY STATUS Eligible Under Provisions Of New Vehicle Limited Warranty Coverage And Emissions Warranty Coverage. Warranty/ESP coverage limits/policies/prior approvals are not altered by a TSB. Warranty/ESP coverage limits are determined by the identified causal part and verified using the OASIS part coverage tool. DEALER CODING BASIC PART NO. CONDITION CODE RECALEM 04 ________________________________________ Module Reprogramming & Initialization Software necessary to program electronic modules to the latest calibration level, perform module initialization (PATS), and set Programmable Parameters on Ford, Lincoln and Mercury vehicles. Ford Module Programming (FMP) is a software application that allows subscribers to program electronic modules on Ford, Lincoln and Mercury vehicles. It can be used for: • Reprogramming emission-related (OBDII) modules on some vehicles manufactured in 1995 and all vehicles manufactured from 1996 to the present • Reprogramming or reconfiguring non-emission-related modules on many vehicles (UBP and MS-CAN not supported) In addition, module initialization (PATS) functions such as Keycode Erase/Reprogram and PCM Parameter Reset can be done using this application. J2534 Device using Ford Module Programming (FMP) can Reprogram and Configure most Modules. Latest Calibration Information Module Build Data (As-Built) Use VIN to obtain As-Built data www.motorcraftservice.com
-
2.5L – DRIVE TO REVERSE DELAYED ENGAGEMENT/SHUDDER Publication Date: September 21, 2016 FORD: 2016 Escape, Fusion ISSUE: Some 2016 Fusion and Escape vehicles equipped with 2.5L engine may experience a delayed engagement/shudder during a drive to reverse shift. This condition occurs when the throttle is applied during reverse engagement. ACTION: Reprogram the powertrain control module (PCM) to the latest calibration using IDS release 102.02 or higher. Make sure you are connected to the internet when entering module programming to obtain the latest updates. Calibration files may also be obtained at www.motorcraftservice.com. NOTE: ADVISE THE CUSTOMER THAT THIS VEHICLE IS EQUIPPED WITH AN ADAPTIVE TRANSMISSION SHIFT STRATEGY WHICH ALLOWS THE VEHICLE’S COMPUTER TO LEARN THE TRANSMISSION’S UNIQUE PARAMETERS AND IMPROVE SHIFT QUALITY. WHEN THE ADAPTIVE STRATEGY IS RESET, THE COMPUTER WILL BEGIN A RE-LEARNING PROCESS. THIS RE-LEARNING PROCESS MAY RESULT IN FIRMER THAN NORMAL UPSHIFTS AND DOWNSHIFTS FOR SEVERAL DAYS. OPERATION DESCRIPTION TIME 160125A 2016 Fusion 2.5L: Reprogram The PCM (Do Not Use With Any Other Labor Operations) 0.4 Hr. 160125A 2016 Escape 2.5L: Reprogram The PCM (Do Not Use With Any Other Labor Operations) 0.4 Hr. WARRANTY STATUS Eligible Under Provisions Of New Vehicle Limited Warranty Coverage. Warranty/ESP coverage limits/policies/prior approvals are not altered by a TSB. Warranty/ESP coverage limits are determined by the identified causal part and verified using the OASIS part coverage tool. DEALER CODING BASIC PART NO. CONDITION CODE RECAL 04 ________________________________________ Module Reprogramming & Initialization Software necessary to program electronic modules to the latest calibration level, perform module initialization (PATS), and set Programmable Parameters on Ford, Lincoln and Mercury vehicles. Ford Module Programming (FMP) is a software application that allows subscribers to program electronic modules on Ford, Lincoln and Mercury vehicles. It can be used for: • Reprogramming emission-related (OBDII) modules on some vehicles manufactured in 1995 and all vehicles manufactured from 1996 to the present • Reprogramming or reconfiguring non-emission-related modules on many vehicles (UBP and MS-CAN not supported) In addition, module initialization (PATS) functions such as Keycode Erase/Reprogram and PCM Parameter Reset can be done using this application. J2534 Device using Ford Module Programming (FMP) can Reprogram and Configure most Modules. Latest Calibration Information Module Build Data (As-Built) Use VIN to obtain As-Built data www.motorcraftservice.com
-
1.5L GTDI – LOW COOLANT – WHITE EXHAUST SMOKE AND/OR ILLUMINATED MALFUNCTION INDICATOR LAMP (MIL) – MULTIPLE DTCS Publication Date: November 2, 2016 FORD: 2014-2017 Fusion 2017 Escape This article supersedes TSB 16-0130 to update the Part List. ISSUE: Some 2014-2017 Fusion and 2017 Escape vehicles equipped with a 1.5L Gasoline Turbocharged Direct Injection (GTDI) engine may exhibit low coolant, white exhaust smoke and an illuminated MIL if diagnostic trouble codes (DTCs) P0217, P300, P0301, P0302, P0303, P0304, P0316 and/or P1299 are present. This condition may be due to an intake manifold bolt backing out causing damage to the charge air cooler (CAC). ACTION: Follow the Service Procedure steps to correct the condition. SERVICE PROCEDURE 1. Check engine coolant level. Refer to Workshop Manual (WSM), Section 303-03. Does the vehicle have a low coolant level? a. Yes – proceed to Step 3. b. No – proceed to Step 2. 2. Connect the Ford Integrated Diagnostic System (IDS) service tool or equivalent scan tool and check for DTCs. Are DTCs P0217, P0300, P0301, P0302, P0303, P0304, P0316 and/or P1299 stored in the powertrain control module (PCM) memory? a. Yes – proceed to Step 3. b. No – this article does not apply. Refer to WSM, Section 303-00 for normal diagnostics. 3. Pressure test the cooling system. Refer to WSM, Section 303-03. Does the pressure remain constant for 2 minutes? a. Yes – this article does not apply. Refer to WSM, Section 303-00 for normal diagnostics. b. No – proceed to Step 4. 4. Using hose pinch pliers, pinch off CAC coolant inlet and outlet hoses. (Figure 1) Figure 1 5. Pressure test the cooling system. Does the pressure remain constant for 2 minutes? a. Yes – proceed to Step 6. b. No – this article does not apply. Refer to WSM, Section 303-00 for normal diagnostics. 6. Remove the CAC. Refer to WSM, Section 303-12. 7. Does the CAC show damage from bolt contact? (Figure 2) Figure 2 a. Yes – proceed to Step 8. b. No – replace the CAC. Refer to WSM, Section 303-12. 8. Replace the intake manifold and CAC. Refer to WSM, Section 303-01. PART NUMBER PART NAME DS7Z-9424-G Intake Manifold – 2014-2017 Fusion GS7Z-8620-A Stretchy Belt – 2017 Fusion Built On Or After 24-Sep-2016 W708728-442 Engine Mount Bolt – 2014-2017 Fusion (2 Req) W719807-S442 Engine Mount Nut – 2014-2017 Fusion (3 Req) DS7Z-9424-J Intake Manifold – 2017 Escape F1EZ-8620-A Stretchy Belt – 2017 Escape Built On Or After 18-July-2016 5F9Z-4682-AA Rear Driveshaft Bolt – 2017 Escape (6 Req) W716136-S442 Engine Mount Bolt – 2017 Escape (2 Req) W520214-S440 Engine Mount Nut – 2017 Escape (3 Req) W520103-S403 Exhaust Nut – All (2 Req) DS7Z-9439-A Intake Manifold Gasket – All DS7Z-9L438-A Charge Air Cooler Gasket – All DS7Z-9E936-A Throttle Body Gasket – All DS7Z-6K775-A Charge Air Cooler – All CV6Z-9450-D Exhaust Gasket – All DS7Z-19B596-A Air Conditioning O-Rings -All VC-3-B Motorcraft Orange Concentrated Antifreeze/Coolant OPERATION DESCRIPTION TIME 160150A 2017 Escape 4X4 1.5L GTDI: Diagnose And Replace The CAC Following The Service Procedure (Do Not Use With Any Other Labor Operations) 3.0 Hrs. 160150B 2017 Escape 4X4 1.5L GTDI: Diagnose, Replace The Intake Manifold And The CAC Following The Service Procedure (Do Not Use With Any Other Labor Operations) 5.1 Hrs. 160150C 2017 Escape 4X2 1.5L GTDI: Diagnose And Replace The CAC Following The Service Procedure (Do Not Use With Any Other Labor Operations) 2.8 Hrs. 160150D 2017 Escape 4X2 1.5L GTDI: Diagnose, Replace The Intake Manifold And The CAC Following The Service Procedure (Do Not Use With Any Other Labor Operations) 4.9 Hrs. 160150E 2014-2017 Fusion 1.5L GTDI: Diagnose And Replace The CAC Following The Service Procedure (Do Not Use With Any Other Labor Operations) 3.0 Hrs. 160150F 2014-2017 Fusion 1.5L GTDI: Diagnose, Replace The Intake Manifold And The CAC Following The Service Procedure (Do Not Use With Any Other Labor Operations) 4.3 Hrs. WARRANTY STATUS Eligible Under Provisions Of New Vehicle Limited Warranty Coverage And Emissions Warranty Coverage. Warranty/ESP coverage limits/policies/prior approvals are not altered by a TSB. Warranty/ESP coverage limits are determined by the identified causal part and verified using the OASIS part coverage tool. DEALER CODING BASIC PART NO. CONDITION CODE 9424 24
-
2010 Ford Fusion Sport 88k Miles about 2 months ago my brake all of a sudden didnt work properly, I had to push it all the way to the ground to make it stop, and it didnt stop very well. Took it to ford, and they said the rear brake caliper needed replacing , and the ABS module was shot , so they replaced with with a used one. about $750 Got the car back, and it wasnt much better , so I took it back. They said the used ABS module was leaking and it needed a replacing, so I got a new one installed. They got the new one, and was ready to give it back, but the new one failed, so they had to replace it again. They tested it and said it still wasnt right, checked the master cylinder and said that was also and issue, and had to replace that and bled it twice. It was at ford for about a week. Just got it back today and it STILL is not better. IM gonna call again in the AM about it. Does anyone know what else could be wrong? should I get a second opinion ? Are they pulling my leg here? any help or advice would be appreciated, thanks!
-
While shifting through gears 1st - 3rd there is no issues. When the vehicle attempts to engage the 4th gear, the engine revs up a bit, but it is not excessive revving, feels like computer rev matching. During this time, there is no slippage, no grinding, no other notable or noticeable problems. The gear simply does not engage. After a few moments (3-5 seconds) it feels as though the computer recognizes a fault, and attempts to engage the last known working gear... Which unfortunately is often 2nd gear as it seems the computer will skip 3rd gear depending on acceleration applied. This causes a jolt, but feels normal for an automatic getting dropped into a lower gear while going a high speed for that gear. After some looking around, I read somewhere that it's possible this was a problem with one of the solenoids. I was curious if anyone else has had this problem, and what they did for a fix. I broke the vehicle down where needed to get into the solenoid valve body area. All I am waiting on is to replace them, but I didn't want to make a purchase if someone else was to say "WAIT, I DID THIS AND IT WORKED". Call me a rookie, I deserve it -- but when I went to drain the transmission fluid It was nasty, and smelled terrible. Could this cause an otherwise operable solenoid to temporarily malfunction? Here is the eBay page showing the solenoids I'm looking at: http://www.ebay.com/itm/like/132018268320?lpid=82&chn=ps&ul_noapp=true
-
 Anyone know of any aftermarket Remote Start options for 2017 Ford Fusion? Viper looks like a good choice.
 -
 Car: 2010 mercury Milan Hybrid 105,000 mi – gas mileage around 32-34 2/2 heavy foot syndrome Problem: Sticking Parking Brake Topics: Test – do coated rotors last any longer than uncoated? Test – Do semi metallic centric pads vs centric ceramic pads? Tips on brake change and caliper reman. Write up on fixing sticky parking brake. A little review on some tools I used to help get the job done! I will make each section clear so that if you want to skip ahead you can. I have a 2010 mercury Milan hybrid – functionally identical to the fusion hybrid from the same year. These vehicles also share many parts between years 2006 and 2011. In my research, I have also found that the same caliper or similar set up used in Honda civics as well as a few VW products. I mention them to help as many people as possible with this problem. This type of caliper is used on many vehicles. Problem Detail: I started this project because my rear brakes were sticking whenever I used my parking brake. They would release however it would take about 45 min or so. The symptom seemed to get worse in the winter time giving the impression that the brakes would “FREEZE” and come off later. This chews up pads premature and can overheat and destroy calipers, rotors, and pads. There seem to be a lot of people complaining of this issue. Now that I understand it I think I have devised a good work around. The brakes on my hybrid were in decent condition with about 30% life left considering 100,000 + MI, I would not have changed them if I had not encountered this problem. ------------------------------------------------------------------------------------------------------------------------------------- First things first *Always perform any changes to the brake system in axle pairs – DO NOT PUT ALTERNATING PARTS LEFT TO RIGHT YOU WILL GET UNPREDICTABLE RESULTS AND RISK SAFETY OF YOURSELF AND THOSE SHARING THE ROAD WITH YOU. Having said that in all caps I do think it is safe to have different brakes back to front – I did pick choose the semi metallic to be up front to maintain the bias toward the front brakes. Test 1 Do coated rotors last longer without rust than plain? Simple problem – easy solution Purchased two different sets of rotors using tire rack online shipped fantastic and great service. I def recommend – however I have noticed that Rock Auto seems to have great pricing and service as well – you will do well with either. Front Brembo Style: Plain Finish: Plain Manufacturer Part #: 405 32085 253 Rear Style: Plain Centric 120 series with coating/paint – not heat treated Finish: Black Manufacturer Part #: 120.61097 Note: (Rear) Plain solid rotor. for models from 12/09-2011 - different part number for other years. I will watch these over the next few months and upload a follow up when they start to rust. I want to see If I can detect any difference in the two. ------------------------------------------------------------------------------------------------------------------------------------- Test 2 – pads On tire rack the ratings and reviews are sparse and the pads I chose are rated very similar on tire racks system. I want to mention again that you should ALWAYS KEEP BRAKE CHANGES IN AXLE PAIRS – do the same left to right per axle. That goes to calipers, rotors, pads and service, always in axle pairs. I purchased from Tire Rack and had great service and shipping. Fronts Posi Quiet Semi-Metallic Pads Manufacturer Part #: 104.11640 Note: Front brake pads Rears Posi Quiet Ceramic Pads Material: Ceramic Manufacturer Part #: 105.11640 The plan is to watch these and see if I feel an improvement in braking feel, force and see if they live up to the rating system on tire rack. The semi metallic should dust a bit more and they could be a little louder. I am currently under the impression that most brake noise is from having poorly lubricated or serviced parts or parts that are wearing out. I chose to put the semi metallic up front because I live in north TN and they supposedly have more bite in the cold. I considered some of the EBS Red Stuff pads but came back to my senses, realizing this was not a race car... Still if I were experimenting (and I am) I would put the higher friction pads up front to keep the bias correct for greater braking up front and lesser in rear; just in case a panic stop comes up on you. Both sets of pads came with install hardware of the plane steel type. I read on another site that hardware/clips with a rubberized backing seem to keep quieter. I did install with clips from rock auto, but also applied caliper lube to the backs and pad slide areas to keep them quiet. Remember never put caliper grease, or any other lubricant on the rotor or pad surface unless it is specifically stated for that purpose. Left is plane steel / right is the coated stuff. Not sure what the coating is. It seems to have some fiber and texture that I can only assume is a urethane or hard rubber for vibration and noise reduction. Maybe someone can enlighten me. In any case the objective is to monitor the pads over the next few weeks to months and try to update based on my findings – I will repost based on dust, noise and stopping power. ------------------------------------------------------------------------------------------------------------------------------------- Brake Service Tips I did service or “reman” the calipers – an enlightening process because it’s not as complicated as it seems. It would have been $150+ (minus a core charge) at each wheel to replace them. Instead I spent an hour cleaning everything up and less than $5 per caliper to replace the seals, bleed screws and time to clean them up.... not nearly as scary a process as we would be led to believe. (always service in pairs to ensure they function the same- just as with any other brake changes AXLE PAIR CHANGES ONLY) Caliper Reman Kits. Front - CENTRIC 14391013 Brake Caliper Repair Kit; Services One Caliper Rear - CENTRIC 14342014 Brake Caliper Repair Kit; Services One Caliper Bleeder Screws - CARLSON H9430 – $1.10 per wheel CARLSON H5810Q Disc Hardware Kit - $5.74 for rear axle. CARLSON H5786Q Disc Hardware Kit - $6.66 for front axle. On the Rear (Left) I only used the main seal and the working seal that goes around the piston (the larger seals). I changed the smaller seal on the back under the parking brake cam and that was a bear. Easy to pull out but a Bi*** to get back in. I do not recommend unless yours is damaged. I did not take the ring clips out and change the innards. If your parking brake actuator does not move well ditch a homemade reman and pony up for a factory reman caliper. (seriously that part was hard) For the remainder of the reman job I cleaned everything up with a trusty harbor freight wire wheel, dremel and wire brush. Any friction surface got cleaned down to bare metal and lubricated with caliper grease. DO NOT SPRAY WD40 OR ANY OTHER LUBRICANT NOT INTENDED FOR BRAKE PARTS ON BRAKE PARTS – the rubber seals will swell and crack leading to failure. The caliper piston easily came out on the rears by actuating the parking brake cam. A lot of people recommend getting the funky little tool that helps to turn the rear calipers in and out. I have it pictured below. I would save the 13 bucks and get an extra can of brake cleaner. Cheapest price was home depot. About a dollar cheaper than the boys or the zone…adds up per can. In any case running the piston in and out with a pair of needle nose pliers was simple. The front caliper pistons can be pushed out by pressing on the brake with the brake lines still attached. I cleaned up the pistons with the wire brush and brake clean. Prior to reinstalling the seals I “rinsed” them in brake fluid and lubricated the seals with brake fluid. Please reference the video for tips on getting the seal back on. There are several methods and it is not as hard as it seems. I did not follow his advice to put the brake grease on the parts subjected to brake fluid – the brake fluid was a great lubricator and I wanted to keep the fluid as “sterile” as possible. Figured I’m flushing it why add another chemical to the mix. Brake grease Is for metal on metal friction surfaces. The pictures below show the parts I am talking about. I am sorry I don’t have as many as I wanted to it’s a dirty job and working a camera with brake fluid is not advised…stuff is nasty wear gloves and don’t touch any painted surface. The Kits shown above for caliper hardware include all new rubber for the other parts of the caliper. I did clean up the pins with the wire brush and cleaned out the old grease by jamming a bunch of new grease into the hole and using the pin to extrude the old stuff. When new fresh grease comes out your done. Don’t fill the hole with grease it needs to have full range of motion. Packing them will prevent being able to insert them fully. Also, the boots need to be “burped” after install. They should sit in a neutral position without excessive air or vacuumed within the boot. I would advise you mark the bracket to indicate which side the guide pins go. They have a front and back with one pin having a rubber grommet. I used a zip tie on the side with a grommet to keep track. All things considered this is an easy job, took me a few hours because I hadn’t done brakes in a long time and I was very meticulous. The second side went way faster. I did use a small amount of anti-seize on threads only. One guy on you tube advised to use that everywhere…BAD IDEA will eat up all the rubber. Don’t listen to that advice from the video. When bleeding the brakes - just go buy some 1/4 tubing from home depot and get yourself a jar. place the tube under the surface of brake fluid in the jar. You can bleed by yourself without spending a ton of money. I would recommend bleeding with the ignition off. The car will send all kinds of errors and the master cylinder seemed to suck fluid back in so fast it would trap air. Don't be shy with bleeding - get ALL the air out - go till no bubbles are seen, and then do a few more. I used 1.5 large bottles of brake fluid. -------------------------------------------------------------------------------------------------------------------------------- Parking brake fix, and probably the reason you’re here. I started by replacing the actual cable. MOTORCRAFT BRCA55 {#AE5Z2A815D} $18.00 Let me preface with “this was a s***** job to do”. Not impossible but tough for a first time and no lift. Would I do it again? Yes because I'm in favor of my vehicles and safety systems working as they should. It involves lifting the center console and working around the heat shield under the car. However, it’s probably a $300 dollar fix from the stealer. I used the help of the Haynes manual for the car to properly remove the center console (not the bad part) without breaking anything. Also after getting the center console free instead of wrestling it out of the car I suspended it out of the way with a bungee cord. The difficult part was getting to the work area. Haynes recommended dropping the exhaust pipe out of the way. If you're able to do that the job would be super easy. I chose to work around that and bent the heat shield out of the way to get to the cable. New washers and bolts are needed to get the exhaust back in place. The shield does bend back easy. I would recommend keeping it because it keeps the heat off the cable you are about to replace… Hard part was getting all the attachment bolts off the heat shield. Two of them were studs held on with clips. I tried to take them off cleanly but ended up just breaking the clips and marring the threads unfortunately. After the heat shield was bent out of the way removing the cable was much easier until it was time to re-insert. Getting the lines through the floor meant working in a small space with the heat shield right where I needed to be. It would go easier if you planned to take the exhaust down and remove the heat shield. I did not remove it because I didn’t have the parts to replace the exhaust after. To get the cable up I “fished” it through the undercarriage using some wire I had laying around. The part rock auto sent was a motorcraft direct replacement. The attachment points on the body were exact, there is little room to do this wrong. It would be impossible to do this backwards. At first it seemed too short but remember it is meant to be the exact length. I needed to take up all slack in the line, sliding the sheaths up through the interior bracket all the way and getting it tight. I got them to move up by yanking on them as hard as I could. After cycling them a few times with the handbrake they fit perfect. When trying to get this part to fit remember (when you’re about to give up) the design needs to be such that it is EXACT; no wiggle room or you won’t be able to transmit the mechanical energy correctly. Taking that into account if they send the correct part # BRCA55, it is only sourced from motorcraft and is identical to the one you just took off. I would advise consulting the Haynes manual for your vehicle and year as well to take things down easily. I’m stealing some info from another forum to help give some other instructions, they are pretty much the same. http://www.mazda3forums.com/110-suspension-brakes-technical-information-faqs-how-tos/393575-how-replace-parking-brake-cable-pic-heavy.html http://www.fordfusionforum.com/topic/12621-parkingemergency-brake-cable-replacement/ Here's the procedure: Remove the floor console. For additional information, refer to Instrument Panel and Console See: Body and Frame\Interior Molding / Trim\Console\Service and Repair. Loosen the parking brake control adjusting nut. Disconnect the rear parking brake cables from the equalizer. With the vehicle in NEUTRAL, position it on a hoist. For additional information, refer to Jacking and Lifting See: Maintenance\Vehicle Lifting\Service and Repair. Support the muffler and tailpipe with a suitable jack stand. Separate the 2 muffler and tailpipe isolators from the vehicle. Remove and discard the 2 catalytic converter-to-exhaust flexible pipe nuts and separate the exhaust flexible pipe and the catalytic converter. Discard the gasket. To install, position a new gasket and tighten the new nuts to 40 Nm (30 lb-ft). ** (In my procedure #’s 5, 6, and 7 were omitted and was still able to complete the project) Remove the heat shield.Remove the 6 nuts, the 2 pin-type retainers and the heat shield.Remove the 2 parking brake cable routing bracket nuts.To install, tighten to 9 Nm (80 lb-in).Remove the 6 parking brake cable routing bracket bolts.To install, tighten to 23 Nm (17 lb-ft). Remove the 2 parking brake cable routing clips. Disconnect the rear parking brake cables from the calipers and remove the cables. To install, reverse the removal procedure. Adjust the parking brake cable. For additional information, refer to Parking Brake Cable Adjustment See: Adjustments. Ok so I got everything back together and tested my brake. To my dismay the problem was better, but not solved. Damn… I took a break overnight to think about the issue and read up. There are multiple stories of people changing calipers and cables, also continuing to have the problem. I considered changing the return spring but it would be impossible for me to design a new spring. It seems the replacement springs only come on new or reman calipers. After sleeping on it I took another look at the problem and figured why CHANGE the spring if I could just ADD a spring… the way I saw it there was a direct linear attachment point to the upper control arm perfectly placed across from the parking brake cam. **at this point I invite you to scroll down and look at the pictures below to help you visualize. (left is left and right is right) I ran to HD and Lowes to check out what springs were available. They had a decent selection. I took measurements before heading out and the distance between my proposed attachment point and the cable actuator (let’s call it the cam) was about 4.5 inches. When pulling the handbrake, it only moved apart another ½ to ¾ inch. Spring choice would be important but simple. The spring had to be “working” at the neutral position or else it would not have the power to retract completely. I ended up choosing an expansion spring with a neutral length of 3 inches and a working load of 4.5 lbs. between the home stores you can go from 1 lb to 65 lbs. The best part is that the springs are sold in pairs for $3-$5 bucks!!! Seriously I bet half of you could just do what I did in the end and make out just fine. I drilled a hole for the spring attachment on the upper control arm and hooked the spring to the handbrake cam. BAM, it has since actuated on and off with no issue. I admit when you see the pictures one side is better placed than the other…something about hindsight being 20/20. The lower attachment point offers a better angle of pull and allows the spring to work in its linear orientation. Final thoughts I don’t seem to notice the added spring weight on the handbrake lever inside. I wouldn’t go super strong in this application because we don’t need it to stress those parts, just help them out. I do think 4-10 lbs. has the sweet spot. I am open to thoughts. Please repost and let everyone know how its working out. If I had thought of this first I would have tried this instead of all the hassle I went through. The springs have a good chance of rusting out, but really if my brake works I would change these yearly for $4 bucks a SET. If you don’t make swiss cheese out of your control arm I don’t think we are harming the structural integrity of the arm, choose the smallest hole you need to get the spring through. -------------------------------------------------------------------------------------------------------------------------------------------------- Tools for the Job I had purchased these over time but wanted to give them a shout since they helped so much. Used the following Milwaukee M12 line Just fantastic. The 3/8ths Impact is awesome. Fits great into the cramped space around the wheels and has the perfect power for this type of use. Most of the time I kept it on the low or #1 setting, about 17 ft/lbs torque. The #2 or high setting is rated around 100 ft/lbs, quite perfect for the wheels since that’s what they are torqued to. I did use a torque wrench to properly tighten the lug nuts. The lights are hands down the best I have used. The square light is the M12 Rover, the longer light the lantern. If you had to choose one for cost I would go for the Rover. Its bright and the angle and ability to hang it is perfect for auto work. Being able to stick it up out of the way is perfect to keep shadows to a minimum and not trip over it. I was having to keep cycling out the batteries because I was taking so long but only once per light. I did have them on start to finish including clean up. 10 hrs.…too long. The dremel tool works like any other dremel but is cordless. I also use it to trim my pup’s nails. Plenty of good reviews on this stuff. I highly recommend the Milwaukee M12 lineup. Harbor freight tools used Jack 3-ton low profile $86 with sale and 20% coupon– did its job with no complaints – I would never trust any jack if you’re under your car. Please always support with quality jack stands. 8-inch Grinder/Buffer – less than $50 with sale and 20% coupon – (never buy anything at HF without the 20% off, your silly if you do) 5/8ths arbor. I changed the grinding wheel for a wire brush from Home Depot. Worked for me. I am not a pro, just Joe DIY; I am actually a physician who likes to tinker. Probably also why I’m so long winded. Hope this helps
 -
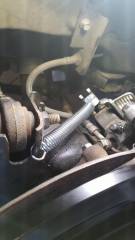
From the album: Brake Job
the better option - make hole lower for straighter/linear pull


