Search the Community
Showing results for tags 'milan'.
Found 10 results
-
Hey all, I recently purchased an 07 Mercury Milan Premier AWD (which to my knowledge is identical to the Fusion in terms of the powertrain). The car has about 110,000 miles and runs great bar a vibration that occurs between 25-35 mph. This vibration is generally more present when the car hasn't yet warmed up. After doing some driving, the vibration mostly subsides. It can be felt pretty strongly in the back of the drivers seat. My first thought was that this is the driveshaft. However, word around the street appears to be that when these do go, I should hear some sort of howl noise. My car remains silent though. Any thoughts on what this can be? Any help would be greatly appreciated. Thanks, Daniel P.S: Putting the car in neutral does not change anything. Also, the car recently began developing a bounce kind of sensation in the front right wheel that typically occurs after driving a bit. Its not pleasant at all and it seems to go away after slowing down a bit.
-
Last summer, I decided I wanted to put (kind of) stock trunk deck subwoofers in my 2006 Fusion SEL. I found a wiring diagram explaining where everything went and we (my dad and I) followed that wiring diagram. Instead of using stock subwoofers for the Fusion generation (2006-2009), I found two subwoofers, Sony, from a 2011 Fusion, same size as the stock ones, 6x9. I couldn't find any stock subwoofers (Audiophile) anywhere. But we used the stock amplifier from the 2006-2009 generation. Before all this, I bought a 2008 Mercury Milan Navigation unit, so it had the 8-pin connection for the amplifier on the back ready to go unlike the unit I had before. I went to a local junkyard and got the connections for the Navigation unit and connections for the actual amp. I bought, one of two, amplifiers on eBay. We followed the diagram exactly, connected the power wire to the fuse box and nothing. We're certain the subs work because we tested them beforehand. After that, I just quit because I thought it was the amplifier, so last week, I bought another one and the same thing, nothing worked. Anyone have any ideas? Could it be that we mixed subwoofers from a 2011 Fusion with an amp from a 2009 Fusion? Also, does anyone know what "Enable CUP" means on the diagram, the VIO/RED one going to the amp? I inserted the wiring diagram.
-
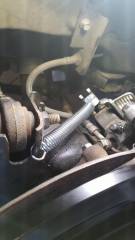
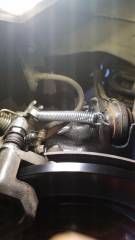
 Car: 2010 mercury Milan Hybrid 105,000 mi – gas mileage around 32-34 2/2 heavy foot syndrome Problem: Sticking Parking Brake Topics: Test – do coated rotors last any longer than uncoated? Test – Do semi metallic centric pads vs centric ceramic pads? Tips on brake change and caliper reman. Write up on fixing sticky parking brake. A little review on some tools I used to help get the job done! I will make each section clear so that if you want to skip ahead you can. I have a 2010 mercury Milan hybrid – functionally identical to the fusion hybrid from the same year. These vehicles also share many parts between years 2006 and 2011. In my research, I have also found that the same caliper or similar set up used in Honda civics as well as a few VW products. I mention them to help as many people as possible with this problem. This type of caliper is used on many vehicles. Problem Detail: I started this project because my rear brakes were sticking whenever I used my parking brake. They would release however it would take about 45 min or so. The symptom seemed to get worse in the winter time giving the impression that the brakes would “FREEZE” and come off later. This chews up pads premature and can overheat and destroy calipers, rotors, and pads. There seem to be a lot of people complaining of this issue. Now that I understand it I think I have devised a good work around. The brakes on my hybrid were in decent condition with about 30% life left considering 100,000 + MI, I would not have changed them if I had not encountered this problem. ------------------------------------------------------------------------------------------------------------------------------------- First things first *Always perform any changes to the brake system in axle pairs – DO NOT PUT ALTERNATING PARTS LEFT TO RIGHT YOU WILL GET UNPREDICTABLE RESULTS AND RISK SAFETY OF YOURSELF AND THOSE SHARING THE ROAD WITH YOU. Having said that in all caps I do think it is safe to have different brakes back to front – I did pick choose the semi metallic to be up front to maintain the bias toward the front brakes. Test 1 Do coated rotors last longer without rust than plain? Simple problem – easy solution Purchased two different sets of rotors using tire rack online shipped fantastic and great service. I def recommend – however I have noticed that Rock Auto seems to have great pricing and service as well – you will do well with either. Front Brembo Style: Plain Finish: Plain Manufacturer Part #: 405 32085 253 Rear Style: Plain Centric 120 series with coating/paint – not heat treated Finish: Black Manufacturer Part #: 120.61097 Note: (Rear) Plain solid rotor. for models from 12/09-2011 - different part number for other years. I will watch these over the next few months and upload a follow up when they start to rust. I want to see If I can detect any difference in the two. ------------------------------------------------------------------------------------------------------------------------------------- Test 2 – pads On tire rack the ratings and reviews are sparse and the pads I chose are rated very similar on tire racks system. I want to mention again that you should ALWAYS KEEP BRAKE CHANGES IN AXLE PAIRS – do the same left to right per axle. That goes to calipers, rotors, pads and service, always in axle pairs. I purchased from Tire Rack and had great service and shipping. Fronts Posi Quiet Semi-Metallic Pads Manufacturer Part #: 104.11640 Note: Front brake pads Rears Posi Quiet Ceramic Pads Material: Ceramic Manufacturer Part #: 105.11640 The plan is to watch these and see if I feel an improvement in braking feel, force and see if they live up to the rating system on tire rack. The semi metallic should dust a bit more and they could be a little louder. I am currently under the impression that most brake noise is from having poorly lubricated or serviced parts or parts that are wearing out. I chose to put the semi metallic up front because I live in north TN and they supposedly have more bite in the cold. I considered some of the EBS Red Stuff pads but came back to my senses, realizing this was not a race car... Still if I were experimenting (and I am) I would put the higher friction pads up front to keep the bias correct for greater braking up front and lesser in rear; just in case a panic stop comes up on you. Both sets of pads came with install hardware of the plane steel type. I read on another site that hardware/clips with a rubberized backing seem to keep quieter. I did install with clips from rock auto, but also applied caliper lube to the backs and pad slide areas to keep them quiet. Remember never put caliper grease, or any other lubricant on the rotor or pad surface unless it is specifically stated for that purpose. Left is plane steel / right is the coated stuff. Not sure what the coating is. It seems to have some fiber and texture that I can only assume is a urethane or hard rubber for vibration and noise reduction. Maybe someone can enlighten me. In any case the objective is to monitor the pads over the next few weeks to months and try to update based on my findings – I will repost based on dust, noise and stopping power. ------------------------------------------------------------------------------------------------------------------------------------- Brake Service Tips I did service or “reman” the calipers – an enlightening process because it’s not as complicated as it seems. It would have been $150+ (minus a core charge) at each wheel to replace them. Instead I spent an hour cleaning everything up and less than $5 per caliper to replace the seals, bleed screws and time to clean them up.... not nearly as scary a process as we would be led to believe. (always service in pairs to ensure they function the same- just as with any other brake changes AXLE PAIR CHANGES ONLY) Caliper Reman Kits. Front - CENTRIC 14391013 Brake Caliper Repair Kit; Services One Caliper Rear - CENTRIC 14342014 Brake Caliper Repair Kit; Services One Caliper Bleeder Screws - CARLSON H9430 – $1.10 per wheel CARLSON H5810Q Disc Hardware Kit - $5.74 for rear axle. CARLSON H5786Q Disc Hardware Kit - $6.66 for front axle. On the Rear (Left) I only used the main seal and the working seal that goes around the piston (the larger seals). I changed the smaller seal on the back under the parking brake cam and that was a bear. Easy to pull out but a Bi*** to get back in. I do not recommend unless yours is damaged. I did not take the ring clips out and change the innards. If your parking brake actuator does not move well ditch a homemade reman and pony up for a factory reman caliper. (seriously that part was hard) For the remainder of the reman job I cleaned everything up with a trusty harbor freight wire wheel, dremel and wire brush. Any friction surface got cleaned down to bare metal and lubricated with caliper grease. DO NOT SPRAY WD40 OR ANY OTHER LUBRICANT NOT INTENDED FOR BRAKE PARTS ON BRAKE PARTS – the rubber seals will swell and crack leading to failure. The caliper piston easily came out on the rears by actuating the parking brake cam. A lot of people recommend getting the funky little tool that helps to turn the rear calipers in and out. I have it pictured below. I would save the 13 bucks and get an extra can of brake cleaner. Cheapest price was home depot. About a dollar cheaper than the boys or the zone…adds up per can. In any case running the piston in and out with a pair of needle nose pliers was simple. The front caliper pistons can be pushed out by pressing on the brake with the brake lines still attached. I cleaned up the pistons with the wire brush and brake clean. Prior to reinstalling the seals I “rinsed” them in brake fluid and lubricated the seals with brake fluid. Please reference the video for tips on getting the seal back on. There are several methods and it is not as hard as it seems. I did not follow his advice to put the brake grease on the parts subjected to brake fluid – the brake fluid was a great lubricator and I wanted to keep the fluid as “sterile” as possible. Figured I’m flushing it why add another chemical to the mix. Brake grease Is for metal on metal friction surfaces. The pictures below show the parts I am talking about. I am sorry I don’t have as many as I wanted to it’s a dirty job and working a camera with brake fluid is not advised…stuff is nasty wear gloves and don’t touch any painted surface. The Kits shown above for caliper hardware include all new rubber for the other parts of the caliper. I did clean up the pins with the wire brush and cleaned out the old grease by jamming a bunch of new grease into the hole and using the pin to extrude the old stuff. When new fresh grease comes out your done. Don’t fill the hole with grease it needs to have full range of motion. Packing them will prevent being able to insert them fully. Also, the boots need to be “burped” after install. They should sit in a neutral position without excessive air or vacuumed within the boot. I would advise you mark the bracket to indicate which side the guide pins go. They have a front and back with one pin having a rubber grommet. I used a zip tie on the side with a grommet to keep track. All things considered this is an easy job, took me a few hours because I hadn’t done brakes in a long time and I was very meticulous. The second side went way faster. I did use a small amount of anti-seize on threads only. One guy on you tube advised to use that everywhere…BAD IDEA will eat up all the rubber. Don’t listen to that advice from the video. When bleeding the brakes - just go buy some 1/4 tubing from home depot and get yourself a jar. place the tube under the surface of brake fluid in the jar. You can bleed by yourself without spending a ton of money. I would recommend bleeding with the ignition off. The car will send all kinds of errors and the master cylinder seemed to suck fluid back in so fast it would trap air. Don't be shy with bleeding - get ALL the air out - go till no bubbles are seen, and then do a few more. I used 1.5 large bottles of brake fluid. -------------------------------------------------------------------------------------------------------------------------------- Parking brake fix, and probably the reason you’re here. I started by replacing the actual cable. MOTORCRAFT BRCA55 {#AE5Z2A815D} $18.00 Let me preface with “this was a s***** job to do”. Not impossible but tough for a first time and no lift. Would I do it again? Yes because I'm in favor of my vehicles and safety systems working as they should. It involves lifting the center console and working around the heat shield under the car. However, it’s probably a $300 dollar fix from the stealer. I used the help of the Haynes manual for the car to properly remove the center console (not the bad part) without breaking anything. Also after getting the center console free instead of wrestling it out of the car I suspended it out of the way with a bungee cord. The difficult part was getting to the work area. Haynes recommended dropping the exhaust pipe out of the way. If you're able to do that the job would be super easy. I chose to work around that and bent the heat shield out of the way to get to the cable. New washers and bolts are needed to get the exhaust back in place. The shield does bend back easy. I would recommend keeping it because it keeps the heat off the cable you are about to replace… Hard part was getting all the attachment bolts off the heat shield. Two of them were studs held on with clips. I tried to take them off cleanly but ended up just breaking the clips and marring the threads unfortunately. After the heat shield was bent out of the way removing the cable was much easier until it was time to re-insert. Getting the lines through the floor meant working in a small space with the heat shield right where I needed to be. It would go easier if you planned to take the exhaust down and remove the heat shield. I did not remove it because I didn’t have the parts to replace the exhaust after. To get the cable up I “fished” it through the undercarriage using some wire I had laying around. The part rock auto sent was a motorcraft direct replacement. The attachment points on the body were exact, there is little room to do this wrong. It would be impossible to do this backwards. At first it seemed too short but remember it is meant to be the exact length. I needed to take up all slack in the line, sliding the sheaths up through the interior bracket all the way and getting it tight. I got them to move up by yanking on them as hard as I could. After cycling them a few times with the handbrake they fit perfect. When trying to get this part to fit remember (when you’re about to give up) the design needs to be such that it is EXACT; no wiggle room or you won’t be able to transmit the mechanical energy correctly. Taking that into account if they send the correct part # BRCA55, it is only sourced from motorcraft and is identical to the one you just took off. I would advise consulting the Haynes manual for your vehicle and year as well to take things down easily. I’m stealing some info from another forum to help give some other instructions, they are pretty much the same. http://www.mazda3forums.com/110-suspension-brakes-technical-information-faqs-how-tos/393575-how-replace-parking-brake-cable-pic-heavy.html http://www.fordfusionforum.com/topic/12621-parkingemergency-brake-cable-replacement/ Here's the procedure: Remove the floor console. For additional information, refer to Instrument Panel and Console See: Body and Frame\Interior Molding / Trim\Console\Service and Repair. Loosen the parking brake control adjusting nut. Disconnect the rear parking brake cables from the equalizer. With the vehicle in NEUTRAL, position it on a hoist. For additional information, refer to Jacking and Lifting See: Maintenance\Vehicle Lifting\Service and Repair. Support the muffler and tailpipe with a suitable jack stand. Separate the 2 muffler and tailpipe isolators from the vehicle. Remove and discard the 2 catalytic converter-to-exhaust flexible pipe nuts and separate the exhaust flexible pipe and the catalytic converter. Discard the gasket. To install, position a new gasket and tighten the new nuts to 40 Nm (30 lb-ft). ** (In my procedure #’s 5, 6, and 7 were omitted and was still able to complete the project) Remove the heat shield.Remove the 6 nuts, the 2 pin-type retainers and the heat shield.Remove the 2 parking brake cable routing bracket nuts.To install, tighten to 9 Nm (80 lb-in).Remove the 6 parking brake cable routing bracket bolts.To install, tighten to 23 Nm (17 lb-ft). Remove the 2 parking brake cable routing clips. Disconnect the rear parking brake cables from the calipers and remove the cables. To install, reverse the removal procedure. Adjust the parking brake cable. For additional information, refer to Parking Brake Cable Adjustment See: Adjustments. Ok so I got everything back together and tested my brake. To my dismay the problem was better, but not solved. Damn… I took a break overnight to think about the issue and read up. There are multiple stories of people changing calipers and cables, also continuing to have the problem. I considered changing the return spring but it would be impossible for me to design a new spring. It seems the replacement springs only come on new or reman calipers. After sleeping on it I took another look at the problem and figured why CHANGE the spring if I could just ADD a spring… the way I saw it there was a direct linear attachment point to the upper control arm perfectly placed across from the parking brake cam. **at this point I invite you to scroll down and look at the pictures below to help you visualize. (left is left and right is right) I ran to HD and Lowes to check out what springs were available. They had a decent selection. I took measurements before heading out and the distance between my proposed attachment point and the cable actuator (let’s call it the cam) was about 4.5 inches. When pulling the handbrake, it only moved apart another ½ to ¾ inch. Spring choice would be important but simple. The spring had to be “working” at the neutral position or else it would not have the power to retract completely. I ended up choosing an expansion spring with a neutral length of 3 inches and a working load of 4.5 lbs. between the home stores you can go from 1 lb to 65 lbs. The best part is that the springs are sold in pairs for $3-$5 bucks!!! Seriously I bet half of you could just do what I did in the end and make out just fine. I drilled a hole for the spring attachment on the upper control arm and hooked the spring to the handbrake cam. BAM, it has since actuated on and off with no issue. I admit when you see the pictures one side is better placed than the other…something about hindsight being 20/20. The lower attachment point offers a better angle of pull and allows the spring to work in its linear orientation. Final thoughts I don’t seem to notice the added spring weight on the handbrake lever inside. I wouldn’t go super strong in this application because we don’t need it to stress those parts, just help them out. I do think 4-10 lbs. has the sweet spot. I am open to thoughts. Please repost and let everyone know how its working out. If I had thought of this first I would have tried this instead of all the hassle I went through. The springs have a good chance of rusting out, but really if my brake works I would change these yearly for $4 bucks a SET. If you don’t make swiss cheese out of your control arm I don’t think we are harming the structural integrity of the arm, choose the smallest hole you need to get the spring through. -------------------------------------------------------------------------------------------------------------------------------------------------- Tools for the Job I had purchased these over time but wanted to give them a shout since they helped so much. Used the following Milwaukee M12 line Just fantastic. The 3/8ths Impact is awesome. Fits great into the cramped space around the wheels and has the perfect power for this type of use. Most of the time I kept it on the low or #1 setting, about 17 ft/lbs torque. The #2 or high setting is rated around 100 ft/lbs, quite perfect for the wheels since that’s what they are torqued to. I did use a torque wrench to properly tighten the lug nuts. The lights are hands down the best I have used. The square light is the M12 Rover, the longer light the lantern. If you had to choose one for cost I would go for the Rover. Its bright and the angle and ability to hang it is perfect for auto work. Being able to stick it up out of the way is perfect to keep shadows to a minimum and not trip over it. I was having to keep cycling out the batteries because I was taking so long but only once per light. I did have them on start to finish including clean up. 10 hrs.…too long. The dremel tool works like any other dremel but is cordless. I also use it to trim my pup’s nails. Plenty of good reviews on this stuff. I highly recommend the Milwaukee M12 lineup. Harbor freight tools used Jack 3-ton low profile $86 with sale and 20% coupon– did its job with no complaints – I would never trust any jack if you’re under your car. Please always support with quality jack stands. 8-inch Grinder/Buffer – less than $50 with sale and 20% coupon – (never buy anything at HF without the 20% off, your silly if you do) 5/8ths arbor. I changed the grinding wheel for a wire brush from Home Depot. Worked for me. I am not a pro, just Joe DIY; I am actually a physician who likes to tinker. Probably also why I’m so long winded. Hope this helps
 -
From the album: Brake Job
the better option - make hole lower for straighter/linear pull -
From the album: Brake Job
-
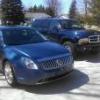
Some updated pictures of "Lucy" my 2010 Mercury Milan Premier. I bought her 2/2012 with 23,000 miles on her and now she has 63,000 miles on her. She is fully loaded only options she doesn't have are the V6 and AWD. She is a "Spring Special", which is why she wear factory special 18" Ford Fusion Sport wheels on her. That's also "Thelma" my 2003 Dodge Durango SLT 4X4.
-
 Hi everyone, I am hoping to do a HID retrofit on my 2006 Milan. It currently has the stock halogen projectors, and I was wondering if anyone on here knows, or has done a successful retrofit on this particular housing. I am interested in what projectors could fit, and preferably ones that will bolt right in place of the old ones.
 -
Hello everyone, I am new to the fourm and I look forward to posting on here. First off, let me just say I am a die-hard Chrysler fan. I just purchased my 2010 Mercury Milan Premier about a month ago. I decided to go w/ a Mercury because I really like the styling of the car, best bang for the buck, and great fuel economy. I wanted something different than a Fusion, since it seems everyone has one here in Metro Detroit. Plus the Mercury is upper scale... but the car is fully loaded. Has the Moon & Tunes package, Sony Surround System, Backup Camera, full leather interior, 18" Fusion Sport wheels, and what not. Future plans are to get the windows all tinted, replace all the bulbs (license plate and the interior bulbs) w/ LEDs, and I have already purchased 8000K HID headlight bulbs. I posted some pictures below... redriderbob
-
Total sales of the first generation FF, Milan, MKZ hybrids up till March 31, 2012 is about 61,500 units per: http://en.wikipedia.org/wiki/Hybrid_electric_vehicles_in_the_United_States A few more thousand may be sold but it looks like this vehicle type population will max out at about 65,000. They will be forever rare.
-
Like an idiot, I backed into my garage tonight while misjudging the distance between the door and my left mirror. Needless to say, the mirror assembly broke off into 3 different pieces. After gathering said pieces, I was able to snap everything back together and re-attach it to my Milan temporarily. It'll have to stay this way until I have the time to pick up a replacement, and install it, as it seems pretty sturdy for now. Somehow the image is distorted now, I didn't know how you could bend glass like that. I'm just worrying that if I go too fast and/or hit a bump, the whole thing will come apart again, and this time, I'll lose all the pieces. Any suggestions for keeping it together until I can properly repair the damage? Anything other than duct tape will be considered. :D